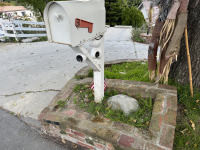
3.25" diameter hemispherical cavity in a 2x4?

stevenkan

Ars Legatus Legionis
15,662
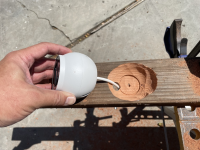
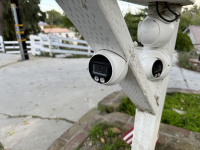
I'm trying to embed an eyeball POE camera into a diagonal brace under my mailbox, because the OEM mounting bracket is significantly wider than a 2x4 (see the other two on the vertical post), and it would be visually very intrusive to have it on that diagonal piece. Here's my crappy first attempt:
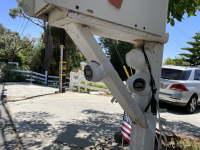
1689097811931.png

The diameter of that eyeball is almost exactly 3.25". I roughed out that cavity with a ball gouge and an angle grinder, but I'd like to make that cavity deeper and a lot more precise.

Any ideas on how to do this? I'm pretty horrible at free-handing stuff, and that diagonal brace is already installed, so ideally the solution would be something I can do in place. But I'm open to all ideas.

edit: typos and links
 
Last edited:

JiveTurkey

Ars Tribunus Angusticlavius
6,218
Subscriptor
I'm trying to embed an eyeball POE camera into a diagonal brace under my mailbox, because the OEM mounting bracket is significantly wider than a 2x4 (see the other two on the vertical post), and it would be visually very intrusive to have it on that diagonal piece. Here's my crappy first attempt:

View attachment 59031

The diameter of that eyeball is almost exactly 3.25". I roughed out that cavity with a ball gouge and an angle grinder, but I'd like to make that cavity deeper and a lot more precise.

Any ideas on how to do this? I'm pretty horrible at free-handing stuff, and that diagonal brace i already installed, so ideally the solution would be something I can do in place. But I'm open to all ideas.
Get a drill press and make a series of concentric rings at increasingly larger depths. Chisel out the rest.
 

Xenocrates

Ars Tribunus Militum
1,660
Subscriptor++
The easiest way I could see would be to do it with a gantry router and a ball mill if you want precision. Would probably be pretty trivial on mine. Second option would be to slather the camera with a thin layer of grease or prussian blue to mark high spots, and repeatedly go at it with a gouge to remove them. Eventually, it will be a reasonably close fit. That's the lower power tool option.

Other than that, you'd likely have to find a dedicated cutting tool, since most spherical cutters are meant for cutting a positive rather than a negative. You could make a single use one with a few pieces of HSS ground to the right profile mounted to some kind of body.

Or go with Jive's suggestion, which is a happy medium that doesn't involve tool making, getting grease everywhere, or expensive machinery.
 

Defenestrar

Senator
13,341
Subscriptor++
For in place you could clamp a series of circular router jigs (smaller circle for deeper cuts). Then smooth the ridges with carving tools.

Or even better would to be attach the router to a ball clamp and move it around in the degrees of freedom available.

If you've a friend with a wood lathe, hit that person up for a custom mount. It'd be super easy.

Without power tools I'd recommend buying the right set of Swiss Pfeil tools. But that probably would cost more than everything in the picture except the car... maybe.

You can also gouge it close the way you're doing, and then wrap sand paper around a 3.25" ball and smooth it that way (possibly using the camera chassis itself).

Finally, I should point out that taking 3.25" out of the center of a 3.5" wide board might not be the most structurally sound idea. You could instead get a 3" hole saw and punch a hole in the middle of some scrap and then use moulding putty, polymer clay, etc... to stabilize your new mount.
 

Wheels Of Confusion

Ars Legatus Legionis
66,177
Subscriptor
A hole saw of the right diameter. Just bore all the way through, or deep enough and then chisel out the rest. You don't need a hemispherical pocket, you just need a void of a certain size/diameter/depth.
Be sure to add another brace behind it to take over the literal heavy lifting of keeping the box perpendicular.
 

von Chaps

Ars Centurion
1,910
Subscriptor
A hole saw of the right diameter. Just bore all the way through, or deep enough and then chisel out the rest. You don't need a hemispherical pocket, you just need a void of a certain size/diameter/depth.
Be sure to add another brace behind it to take over the literal heavy lifting of keeping the box perpendicular.
Was going to say exactly this. You'll be cutting out so much, that brace will be useless. Do what WoC said.
 

stevenkan

Ars Legatus Legionis
15,662
A hole saw of the right diameter. Just bore all the way through, or deep enough and then chisel out the rest. You don't need a hemispherical pocket, you just need a void of a certain size/diameter/depth.
Be sure to add another brace behind it to take over the literal heavy lifting of keeping the box perpendicular.
That's partly why I want to carve the hemispherical pocket; so that I leave some material to do its original job. Here was my first test run with the ball gouge:

1689267852953.png
 

stevenkan

Ars Legatus Legionis
15,662
I had an idea for finishing a rough cavity--what if I could find a 3.25" steel ball, coat it with abrasive grit, and then mount it onto a spinny thing? Someone on another forum suggested welding on a 5/8" nut for a standard angle grinder.

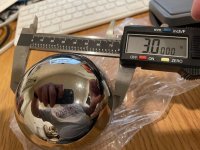
So now the quest was to find a 3.25" steel ball. Amazon doesn't have exactly that, but it does have a 3" chrome steel ball bearing with free next-day shipping for $20, so I couldn't resist. It arrived yesterday:


View: https://www.youtube.com/watch?v=mlo5MKoKFek


If you're in need of a 3" steel sphere, this is the one to get! I don’t know how to interpret or estimate the “G” grades for ball bearings, but this sphere is very round, very shiny, and very dense!

Also dead-on-balls accurate at 3.000” diameter. At first it said 2.995” as I passed it through my caliper, and then just as I snapped the photo it flipped over to 3.000”! Dead serious!

1689268635118.jpeg

I don't know if I will ever actually create a grinding tool with this*, but it's neat to have as a desk toy.

* I have visions in my head of a 4 lb. sphere breaking off the nut and rocketing up my driveway and down the street at 9,000 rpm.
 
Wouldn't it be easier to rebuild the mailbox post to hold the OEM mount? Or otherwise re-engineer the post to be more aesthetically pleasing / functional?

All the other solutions proposed seem much more complicated and expensive.

Or is that one of those comments that's just taking the fun out of the whole exercise?
 

cogwheel

Ars Tribunus Angusticlavius
6,691
Subscriptor
That's partly why I want to carve the hemispherical pocket; so that I leave some material to do its original job. Here was my first test run with the ball gouge:

View attachment 59133
If you do stick with this, I'd still beef up the knee brace since WoC is right, you're taking so much wood out that the 2x4 won't do its job (assuming it has a job in the first place instead of being primarily decorative). I'd probably replace the knee brace with a chunk of 4x4 instead of scabbing on a second 2x4, but either would work.

I'd probably just go overkill: replace the entire mailbox support with a 6x6 post plus 3x6s or 4x6s for the mailbox mounting plate and knee brace, so the OEM mounts don't stick out past the edges. Since you're effectively dealing with no structural loads at all, you could even route a groove in the 6x6 for the cabling, instead of having it hanging down beside the post.
 

stevenkan

Ars Legatus Legionis
15,662
The knee brace isn't carrying much load. The horizontal piece is actually held in tension by a pretty big carriage bolt from behind, and the mailbox is also screwed into the vertical post. Some of the posts in the neighborhood don't even have a knee brace.

But I don't want to rebuild the whole thing, since it's already in place. And I think a 6 x 6 would be a bit too beefy, and would look out of place relative to my neighbors' mailboxes.

I have started routing out a cable channel, but it's not finished yet. More photos to come . . .
 

stevenkan

Ars Legatus Legionis
15,662
Or is that one of those comments that's just taking the fun out of the whole exercise?
Definitely!

And to add back in some fun, consider the following physics question for the kids:
* I have visions in my head of a 4 lb. sphere breaking off the nut and rocketing up my driveway and down the street at 9,000 rpm.

Ignoring air resistance and the trivial mass of the grit, and assuming perfectly efficient transfer of rotational kinetic energy to translational kinetic energy, at what speed will the sphere be rocketing down my street at equilibrium?

Bonus points for expressing in answer in furlongs-per-fortnight.
 

Defenestrar

Senator
13,341
Subscriptor++
The knee brace isn't carrying much load. The horizontal piece is actually held in tension by a pretty big carriage bolt from behind, and the mailbox is also screwed into the vertical post.
Remember what Archimedes said about cantilevered mailboxes.

Also, one can get official structural guidance from the postal service. There are safety and liability reasons to not have an overly strong box and post.

To get drawings and measurements for building your own mailbox, write to US Postal Service Engineering.
 

Xenocrates

Ars Tribunus Militum
1,660
Subscriptor++
Machining hardened ball bearings is probably super fun.
Yes, it is. Especially if you need them to still work as a bearing. We had to bore soft jaws perfectly to fit, using chuck rings to preload the jaws, then you really, really need carbide tooling to get through the hard chrome plating that is typical. After that, it's just like machining regular hardened steel, until it's time to deburr everything and send it out to be re-chromed. It's a good thing we individually fitted the balls to their housings, which typically took about 5 iterations with prussian blue to get a good surface print, since the chrome wasn't 100% consistent in it's thickness.
 

Cool Modine

Ars Tribunus Angusticlavius
8,539
Subscriptor
it would be visually very intrusive to have it on that diagonal piece.
I think that ship sailed a long time ago, what with all the cable clutter and the fact that you have three cameras on the post.

You might well be better off ditching the knee brace entirely, or else extend the horizontal beam behind the mailbox, and have a smaller diagonal brace on the back.

Also, regarding the original question about a hemispherical hole: You don't really need one. A cylindrical hole would do the job just fine. What might work even better would be making the hole on the back side of the beam. Make a wider hole the width of the camera ball, and a smaller though-hole that the camera front peeks out of, and that will serve to capture the camera as well.

If I was really going to do this, I think I'd frame up a new "post" that's much larger, with a hollow interior space that can hold the wiring.
 

stevenkan

Ars Legatus Legionis
15,662
I think that ship sailed a long time ago, what with all the cable clutter and the fact that you have three cameras on the post.

You might well be better off ditching the knee brace entirely, or else extend the horizontal beam behind the mailbox, and have a smaller diagonal brace on the back.

Also, regarding the original question about a hemispherical hole: You don't really need one. A cylindrical hole would do the job just fine. What might work even better would be making the hole on the back side of the beam. Make a wider hole the width of the camera ball, and a smaller though-hole that the camera front peeks out of, and that will serve to capture the camera as well.

If I was really going to do this, I think I'd frame up a new "post" that's much larger, with a hollow interior space that can hold the wiring.
Are you calling my mailbox ugly? Them's fightin' words!!!

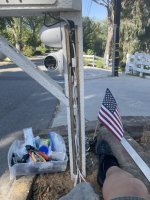
But seriously, I am in the midst of burying those cables. I was going to hold off posting photos until I got the painted aluminum strip on there, but here's my progress as of last weekend:
1689982328364.jpeg

It's amazing how much room those connectors take up. I thought I'd have plenty of room with a ~1.25" W x ~1.25" deep channel in there, but it just barely fits, and I even had to chisel out a small piece to make one junction fit. But it does fit, and it looks reasonably tidy once the aluminum strip is on. I'm just waiting to put a second coat of paint on it.
 

stevenkan

Ars Legatus Legionis
15,662
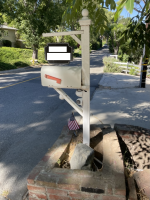
Aluminum strip is on!

1691279368752.png

A little white silicone caulking here and there would help a bit, especially if that last little camera had a white cable :mad:.

I still need to a bit of reorganizing of the cables exiting the bottom of the post, surround the fake rock with dirt, and fill in the trench that leads off to the right and down to my garage, 80' away.

But all the functional bits are now in place, and all the cameras are working. I ran some 12 AWG speaker wire in the conduit as well, currently carrying +12 VDC for the illuminator in the mailbox and anything else I might want to power someday.
 
Last edited:

stevenkan

Ars Legatus Legionis
15,662

SirMrManGuy

Wise, Aged Ars Veteran
128
Not that it helps at all but the old-school machinist way of cutting convex or concave speherical shapes is with a fly cutter in a milling head tilted 45deg and the work piece in a rotary table. Obviously of no use for home shop woodworking but an interesting exercise in understanding geometry.


stevenkan

Ars Legatus Legionis
15,662
If I was really going to do this, I think I'd frame up a new "post" that's much larger, with a hollow interior space that can hold the wiring.
Yeah, if I ever have to rebuild this mailbox post from scratch I'd probably do four 2 x 4s in a "box" pattern with a hollow center, as you've described, and I'd route out cavities for all of my cameras before final assembly.
 

stevenkan

Ars Legatus Legionis
15,662

stevenkan

Ars Legatus Legionis
15,662
I still need to a bit of reorganizing of the cables exiting the bottom of the post, surround the fake rock with dirt, and fill in the trench that leads off to the right and down to my garage, 80' away.
The rock has had enough mud splashed on it that it now looks a bit more realistic:
1710821632326.png

and here's a closeup of that camera, zip-tied into the vaguely hemispherical cavity that was the motivation for this entire thread:

1710821652187.png
 
Last edited:
  • Like
Reactions: JiveTurkey

Xelas

Ars Praefectus
5,444
Subscriptor++
Nylon degrades rapidly in UV light and turns very weak and brittle fairly quickly. I give that nylon tie not more than a few months before it breaks, and no more than a few weeks if it gets direct sun for periods of time. Unfortunately, the fix for that is to make them with black dye so that the UV can't penetrate, but that will really stand out on your white paint, but even black ones don't hold up outdoors indefinitely.
 

Drizzt321

Ars Legatus Legionis
28,408
Subscriptor++
Some epoxy onto a bolt onto the back of that camera, and then sister up a piece of wood that it'll reach through onto the back of that support with a few screws after painting should do if you want to be able to remove it reasonably easy.

I'd sister it up, drill a hole, get the bolt stabilized to where it'll make contact with the camera. Ladle on some epoxy, put the camera on adjusted to where it needs to be and use some bungees and/or zip ties to hold it in place. 24hr later should be securely epoxied to the bolt.

Or add a piece of wood underneath, with a bit of a rounded or diamond, or even just v groove down the center part. Paint, put it up against the bottom of the camera, a few good wood screws and that should "clamp" it into place reasonably well.
 

Shavano

Ars Legatus Legionis
59,253
Subscriptor
Nylon degrades rapidly in UV light and turns very weak and brittle fairly quickly. I give that nylon tie not more than a few months before it breaks, and no more than a few weeks if it gets direct sun for periods of time. Unfortunately, the fix for that is to make them with black dye so that the UV can't penetrate, but that will really stand out on your white paint, but even black ones don't hold up outdoors indefinitely.
I know it sounds stupid but one easy fix for that is paint the zipties with white paint. It'll stop most of the UV.
 
If you have large sturdy drill press and a metal lathe my thought would be to try whipping up what is basically a 3.25 inch spade drill with a round profile. Though you'll probably need lots of clamps and brass cohones to actually attempt to use such a thing only to to make the lightest of finishing passes. I could also think of some ways to get close with a router jig and lots of patience but it would be a very complicated rig just to make a one off mount for a camera on a mail box. (Router constrained to straight line moves with depth restricted by a semicircle depending on position along the line. Rotate the work-piece relative to the jig in steps until you've completed 180 degrees while using a ball-nose/core-box bit of the largest size you can safely handle on your router)

To be honest I'm not even sure why you need 3 cameras on a mailbox but that's maybe just me...
 
Last edited:

stevenkan

Ars Legatus Legionis
15,662
To be honest I'm not even sure why you need 3 cameras on a mailbox but that's maybe just me...
A couple of years ago we had a rash of petty vandalism and even a break-in burglary in this neighborhood, despite being pretty far up a steep hill with only one entry/exit to the main street. And of course we have the persistent trickle of mail thefts and package thieves.

So putting one camera on the mailbox was a no brainer, and I'm here on Ars, so if one camera is good, 4 cameras is better! There's a tiny one inside, so I can see if/when I actually got mail delivered and/or if there's mail in the box. It was cheaper/easier than integrating some sort of contact switch.
1713033326834.png